HVAC Troubleshooting Cheat Sheet
Welcome to the HVAC Troubleshooting Guide! Your HVAC system is essential for maintaining a comfortable and healthy indoor environment, but occasional issues can arise. Whether you're a handy DIY homeowner or a professional technician, this comprehensive cheat sheet is designed to be your go-to resource for identifying and resolving common HVAC problems. From insufficient cooling to strange noises, we've compiled a handy list of troubleshooting tips to help you diagnose and address issues quickly and efficiently. Remember, safety comes first, and for complex problems, it's always best to seek the expertise of a licensed HVAC professional. Let's dive in and get your HVAC system back on track! We do not recommend performing any troubleshooting on an HVAC unit unless you have the knowledge, PPE, and necessary testing tools. If you are looking for a more basic guide, check out HVAC Troubleshooting Guide Every Homeowner Should Know
Disclaimer: The information provided in this HVAC troubleshooting cheat sheet guide is intended for general guidance and informational purposes only. While we have made every effort to ensure the accuracy and comprehensiveness of the content, HVAC systems can vary significantly, and specific troubleshooting steps may differ based on individual system designs, models, and configurations.
The content in this guide is not a substitute for professional advice or HVAC system evaluation by a licensed technician. Attempting to diagnose, repair, or modify HVAC systems without the appropriate knowledge and experience can be dangerous and may result in injury, property damage, or voiding of equipment warranties.
We strongly recommend seeking the assistance of a qualified HVAC professional for any complex issues or repairs. They have the expertise and tools to properly diagnose and resolve problems, ensuring the safety and efficiency of your HVAC system.
By using this guide, you agree that the authors, creators, and publishers of this content shall not be held liable for any damages or losses incurred directly or indirectly from the use or misuse of the information provided. Always prioritize safety and rely on professional expertise for HVAC system maintenance and repair.
Symptom: Nothing is Running
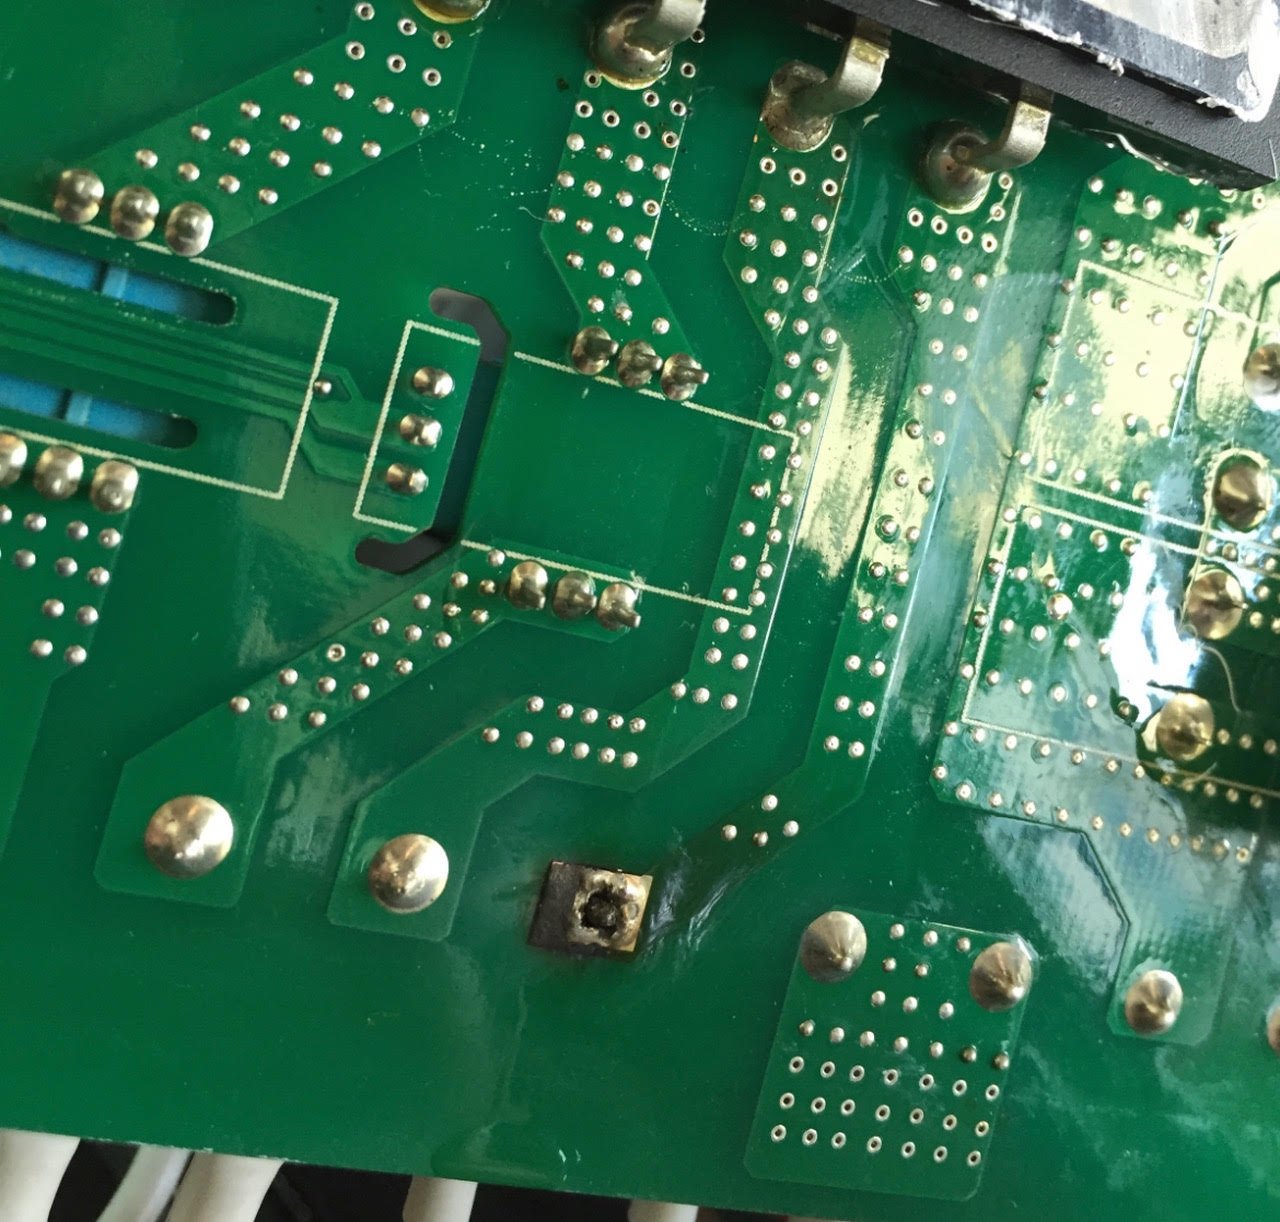
Burn Marks on HVAC unit circuit board
Ensure the thermostat is set to "cool" (for AC) or "heat" (for heating).
Check the circuit breaker/fuse box and reset/replace it if necessary.
Replace dead batteries in the thermostat.
Check if the disconnect switch near the outdoor unit is turned on and fuses are closed
Inspect the indoor unit's power switch; ensure it's on.
If high voltage is present, verify that step down transformer is providing low voltage to control circuit
Verify all wiring is connected with no burns or chaffed wiring
Symptom: Outdoor Fan is running, but compressor is not running
Verify that there is a call for cooling and that the fan contactor/relay isn’t stuck closed
Check to ensure that all refrigerant circuit safties are closed. If open, determine the cause for safety tripping
Check compressor contactor coil
If 3 phase, verify all three legs of power meet nameplate requirements
If Single phase, verify compressor capacitor microfarads within range.
Verify compressor winding resistance. 3 phase windings should all be equal readings. Single-phase windings will have different resistance ratings from Common to Start, Common to Run, and through both run and start. Video instructions are below. Looking for a quality multimeter? Check out the Fluke 902FC on Amazon HERE
Symptom: Compressor is Turning on and off After Only a few Seconds
Check compressor amp draw and determine if over amping.
Verify thermostat location is correct and not being influenced by sources that could alter readings
Verify condenser fan comes on with the compressor, if the fan is on head pressure or fan cycle control verify operating head pressure and switch position.
Verify coil and filters are clean
Check High and low-pressure safeties to determine if one of them is opening during run and resetting during off cycle
Check if the compressor is hot to the touch and verify if the thermal overload is tripping the compressor
Symptom: Indoor Fan is running but not getting any cold or hot air
Check the thermostat setting. A setting of “Fan ON” will allow the indoor fan to run all of the time. “Fan AUTO” will allow the fan to run only when heating or cooling.
Check thermostat is set to the proper mode and temperature setpoint.
Check for leaky or damaged duct work
Verify compressor is running. If compressor is running, use refrigerant gauges (Best Digital HVAC Gauges) to determine proper refrigerant levels and metering device operation
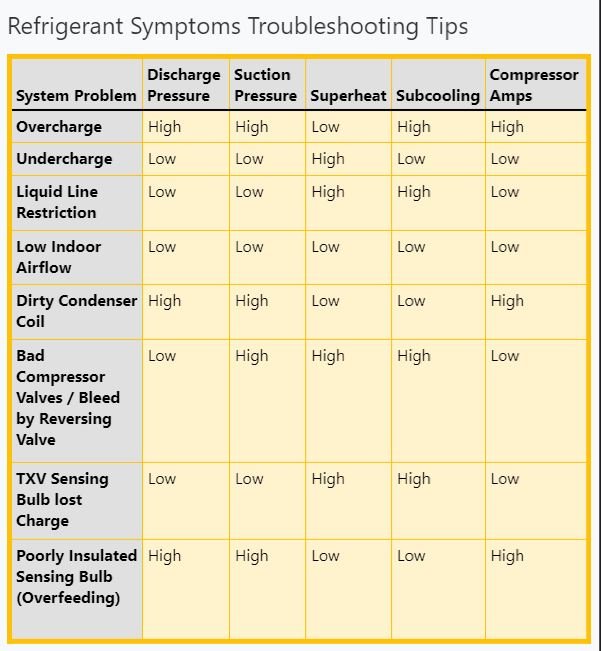
Superheat and Subcool Readings
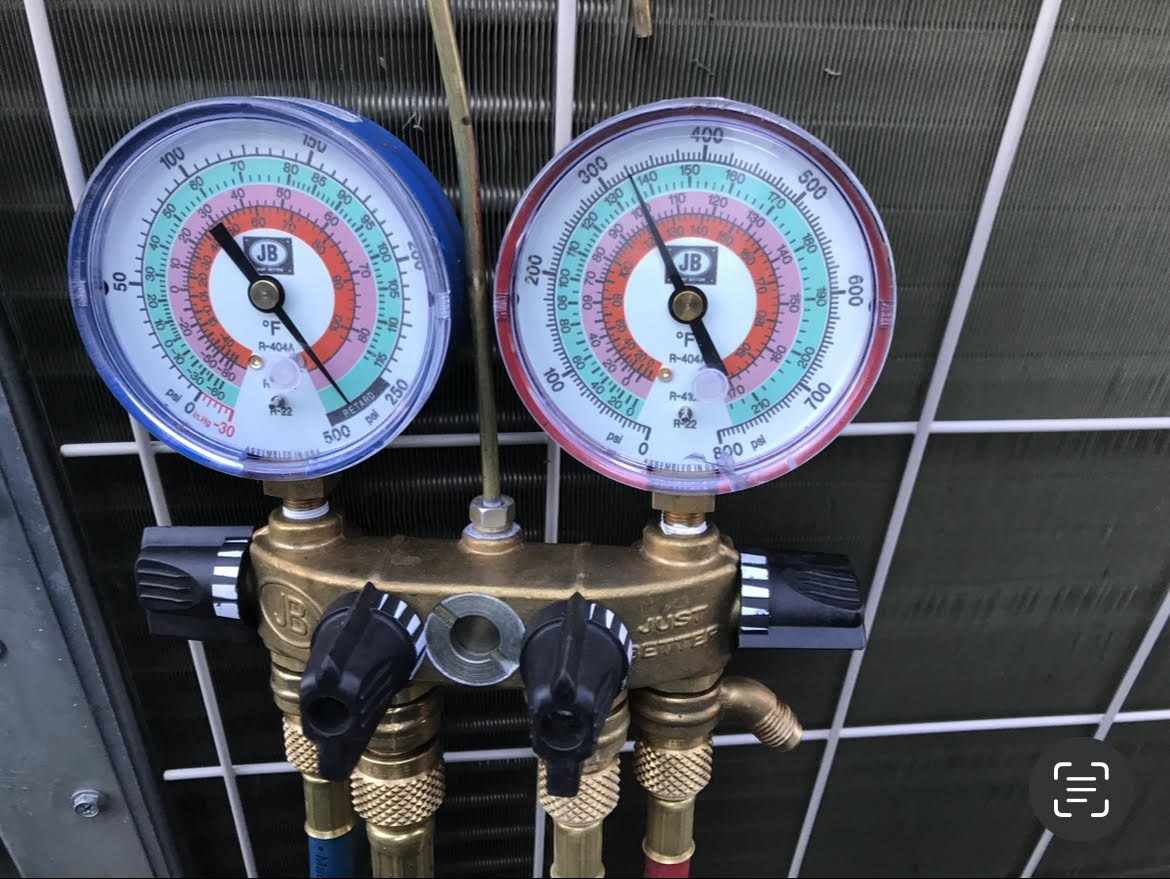
Checking system refrigerant on HVAC unit using Gage Manifold
1. High Subcooling and High Superheat:
Symptoms: If both subcooling and superheat are high the system is experiencing a high side restriction. These restrictions can form in the filter drier, solenoid valve or metering device. High subcooling suggests that too much refrigerant is being condensed due to restriction holding refrigerant back in the condenser, while high superheat indicates that too not enough refrigerant is being fed to the evaporator. This can lead to reduced system efficiency and potential damage to the compressor over time. Depending on the size of the restriction, compressor amp draw is typically lower than normal due to performing less mechanical work.
2. Low Subcooling and Low Superheat:
Symptoms: Low subcooling and low superheat are usually associated with a faulty or oversized metering device. In this scenario, the metering device is feeding too much liquid refrigerant to the evaporator. When the metering device is overfeeding, it is not restrictive enough to create enough back pressure to stack refrigerant in the condenser, which results in low subcooling. Some metering devices are fixed such as capillary tubes and pistons. TXVs are offered in both adjustable. Before adjusting an overfeeding TXV its important to verify proper placement of the TXV Sensing bulb. The compressor amp draw will be higher than normal due to dense refrigerant vapor or liquid entering the suction of the compressor.
3. High Subcooling and Low Superheat:
Symptoms: High subcooling combined with low superheat typically indicates an overcharge issue. The excessive refrigerant being condensed leads to high subcooling. Most metering devices can only close to a certain point causing excessive amounts of refrigerant to be fed to the evaporator. Too much refrigerant in the evaporator coil can prevent the refrigerant from changing state (liquid to gas), resulting in low superheat. This can cause erratic system performance, compressor slugging and oil issues. The compressor amp draw will be higher than normal.
4. Low Subcooling and High Superheat:
Symptoms: Low subcooling and high superheat are often caused by low refrigerant charge. The insufficient refrigerant in the condenser leads to less liquid refrigerant, thus low subcooling. In turn, inadequate refrigerant is fed to the metering device and results in a starved evaporator coil. This leads to inadequate heat absorption and higher boiling temperatures. As a result, the refrigerant leaving the evaporator has a higher temperature (high superheat) than it should under normal conditions. This can lead to poor cooling or heating performance, increased compressor wear, and potential ice formation on the evaporator coil. The compressor amp draw will be lower than normal.
Refrigerant oil on piping indicating a leak
Symptom: Strange Noises
Rattling or banging noises may indicate loose components or panels needing tightening and securing.
Squealing sounds may be due to a loose belt or a failing blower motor; replace as needed.
Hissing or gurgling noises might indicate a refrigerant leak or condensate drain issue.
Grinding noises may signal an issue with the motor or fan bearings
Symptom: HVAC system is constantly running and gets too hot or too cold
Check if the thermostat fan setting is set to "on" instead of "auto."
Inspect the thermostat for stuck relay issues or faulty wiring.
If heat pump: verify o/b is programmed correctly
Verify that reversing valve cycling and not stuck in one mode of operation
Verify compressor contactor is not stuck or welded closed
Symptom: Unpleasant Odors From HVAC Unit
Musty smells may indicate mold or mildew growth in the ducts or on the indoor coil that needs to be cleaned.
Burning odors could mean electrical issues. Verify fan motor, wiring, control boards, and heat exchangers.
Rotten smells may suggest dead animals in the ductwork.
Symptom: Weak Airflow
Check and replace dirty air filters.
Inspect the blower motor and fan for debris or damage; clean or replace if needed.
Check for blocked vents and registers, and make sure they are fully open.
Inspect the ductwork for leaks, gaps, or damage; seal or repair as necessary.
Symptom: Water Leaking
Check the condensate drain pan and drain line for clogs; clean or clear them if necessary.
Verify P-trap is installed and sized correctly.
Inspect the evaporator coils for frost or ice buildup; this could indicate a refrigerant issue requires gauging up to the system.
Check for water leaks around the indoor unit and repair any damaged seals or connections.
Symptom: High Humidity Levels
Ensure the thermostat is set to the right humidity level (if equipped with humidity control).
Check for and repair any duct leaks, as they may draw in humid air from the outside air.
Verify HVAC system is sized correctly. Oversized units will typically cool a space very quickly which prevents the unit from running long enough to remove the moisture from the air
Consider using a dehumidifier if your HVAC system doesn't have humidity control.
Symptom: Gas Furnace won’t Ignite or stay running
Verify the gas supply is turned on and there are no supply interruptions.
Check the pilot light or ignition system for issues
Verify spark or hot surface ignitor attempt to fire
Verify incoming gas pressure meets nameplate specifications
Verify gas valve is opening and is adjusted to correct pressure
Inspect and clean the burners and flame sensor.
Check safties on heater circuit
Verify discharge air temp is within manufacture specified range
Verify air filter is clean and not restricting airflow causing high temp limit safety to trip
Verify condensate pan is draining on high efficient furnaces
Check condensate neutralization is draining freely and change media if necessary
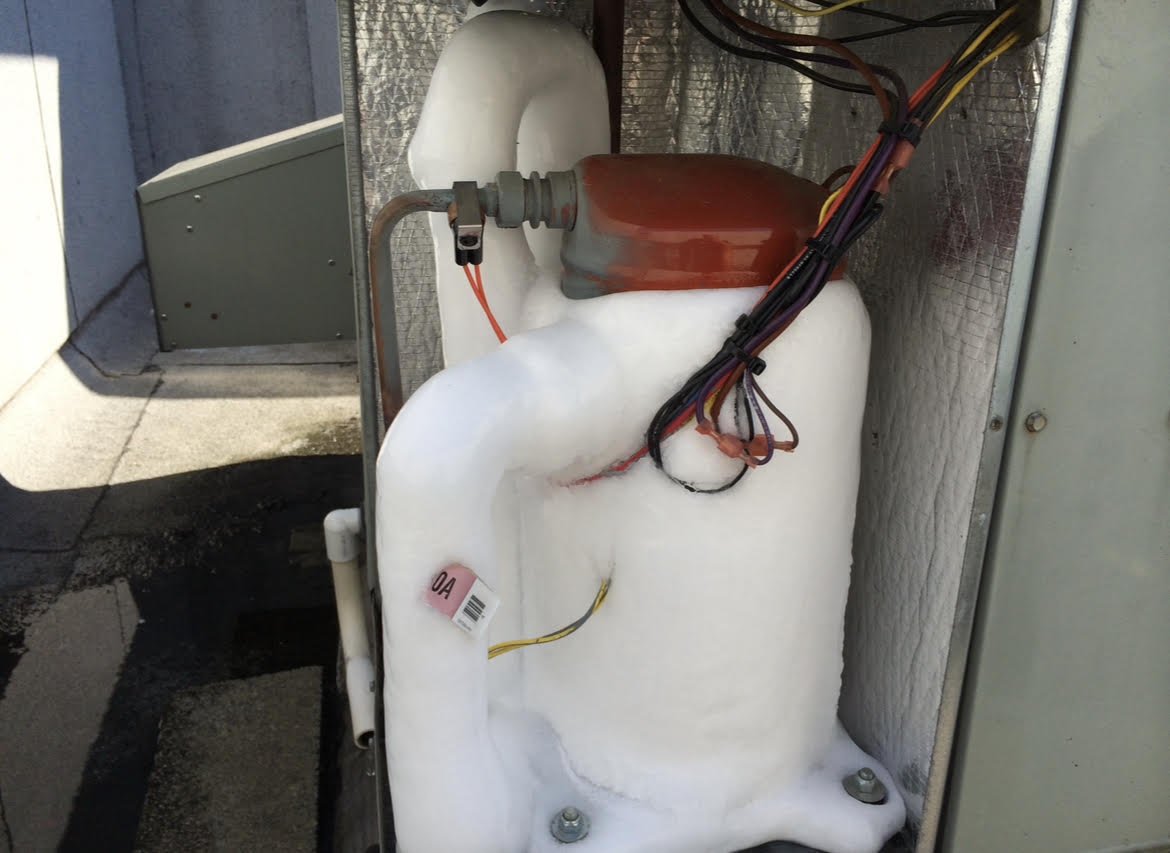
Symptom: Ice on Outdoor HVAC Unit
Iced up compressor on HVAC unit
Verify Defrost timer board sequence
Check that temperature resistors are within range
Verify Refrigerant charge is correct and no other refrigerant component issues
Ensure coil is clean and free of obstructions and fan is operational
Symptom: Ice on Indoor HVAC Unit
Check air filter and coil are clean and free of obstructions
Verify temperature setpoints are correct on the thermostat
Check that the return duct is not pulling in supply air
Verify Refrigerant charge is correct and no other refrigerant component issues
If equipped with an economizer our fresh air intake verify proper amount of outside air
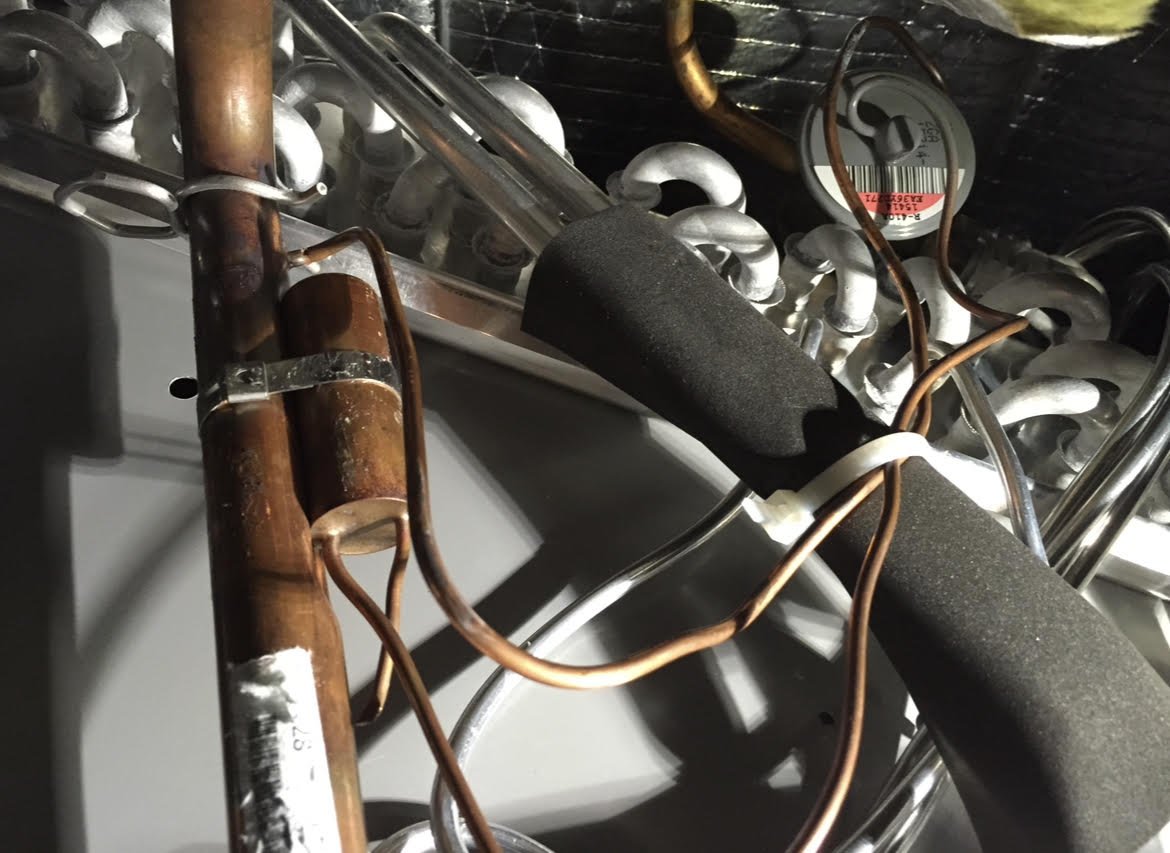
Uninsulated TXV sensing bulb
Symptom: Energy Bills are Unexpectedly High
Photo Credit: @jpvalery
Check air filter and coil are clean and free of obstructions
Verify temperature setpoints are correct on the thermostat
If equipped with an economizer our fresh air intake, verify the proper amount of outside air
If a heat pump with dual fuel or backup heat, verify the thermostat and or outside air lockout is programmed correctly. Electric heat strips use much more energy than a heat pump.
As an Amazon Associate HVAC Tool Review earns commission from qualifying purchases

